Prior to Installation
These instructions only cover the installation of Diamond Pier foundations in residential applications where normal soil conditions exist and the “Residential Diamond Pier Load Chart” (Table 1) is referenced (see discussion of “Normal Soil Conditions” and “Residential Diamond Pier Load Chart”).
Please also view the “Installation” video we provide.
1. Inspect for Underground Obstacles
The same obstacles that conventional foundation systems encounter, such as rocks, tree roots, underground utility lines, and other buried objects, can also obstruct the Diamond Pier foundation. Refer to “Encountering Obstructions” for instructions on handling buried obstacles. If an obstacle is encountered that cannot be passed using the breaker hammer while driving the pins and not cracking the concrete pier head in the process, the pins can be removed and the concrete head rotated, allowing the pins to penetrate the soil in a different location.
2. Locate Buried Utilities
WARNING: Do not install Diamond Pier foundations before all underground utilities have been located, marked, and de-energized.
All underground utility lines must be located and properly marked by your local official utility locating service, and all privately run lines must also be identified and located by the proper authority. If there are any electrical lines in the area, de-energize the power source prior to installing the Diamond Pier foundations. Never allow bodily contact with uninsulated portions of the automatic breaker hammer. Wear properly rated rubber-insulated gloves and boots. In addition, if underground utilities are located on the site, check with your local utility locating service to confirm required safety zones. You must ensure that the horizontal pin distance for your foundation will have adequate horizontal clearance to be well outside all safety zones, including the 6" Diamond Pier (DP) safety zone (see Figure 2 and Table 2).
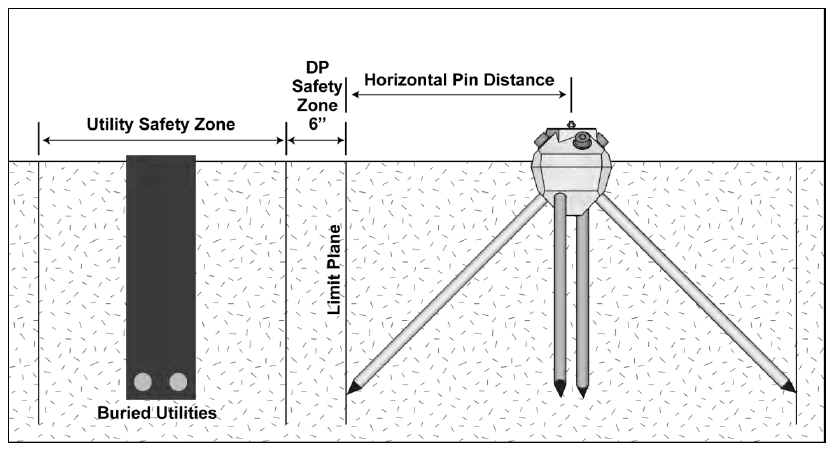
Figure 2. Horizontal Pin Distance
After installation, horizontal distance of all pins must be well outside all safety zones.
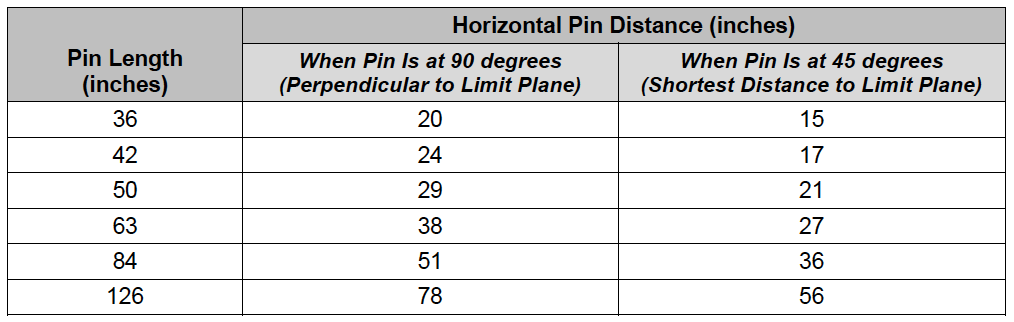
Table 2. Horizontal Pin Distance for All Diamond Pier Models
Measured from center of pier anchor bolt horizontally to vertical limit of pin end.
3. Check Your Layout
To meet the load bearing capacities shown in the “Residential Diamond Pier Load Chart” (Table 1), Diamond Pier foundations must be spaced a minimum of 3 feet apart (from center of pier anchor bolt to center of pier anchor bolt). If they are spaced less than 3 feet apart, the bearing capacity must be reduced by 13% for each closer-spaced pier. The piers must also be set back the correct horizontal distance from existing foundations or other buried obstacles, as shown in Table 2. Tributary loads from the supported structure must be properly calculated, and the piers spaced accordingly, so that each pier is supporting only up to its designated allowable loads.
4. Assemble Tools and Supplies
You will need to assemble the following tools and gear:
- Automatic driving hammer with 1-1/8" hex shaft driving bit (see “Breaker Hammers and Driving Bits”)
- Square-edge shovel
- Sledgehammer
- Torpedo level
- Tape measure
- Pipe wrench
- Proper protective gear, including safety goggles, ear protection, insulated gloves, protective clothing, and boots
We recommend a minimum two-person crew for installation.
5. Inspect and Prepare Diamond Pier Components
Inspect your Diamond Pier assemblies (see Figure 3) to ensure that no parts are flawed or have been damaged in shipping. Do not install a concrete pier if it has a structural crack with a fissure running internally into the head (see “Concrete Head Integrity” on page 16). Slight flaking or chipping is acceptable; a concrete head with surface flaking or chipping may be installed.
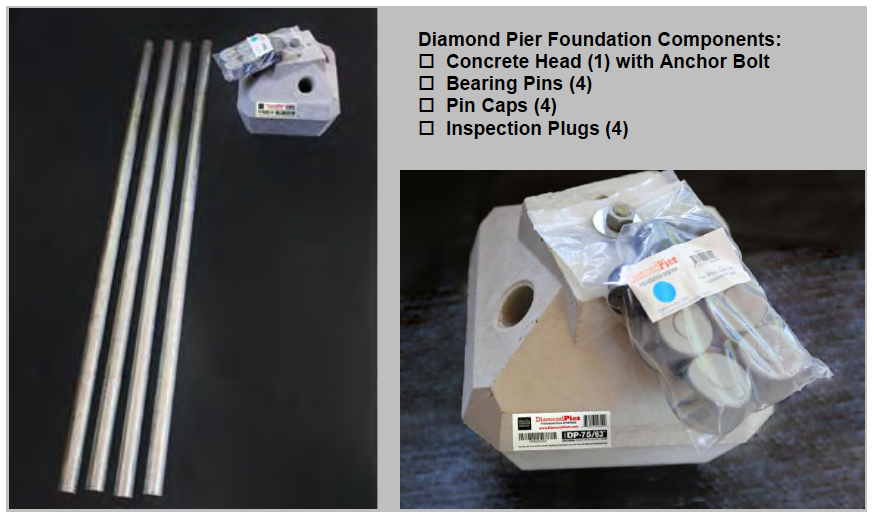
Figure 3. Diamond Pier Model DP-75/63"
Concrete Head with Bearing Pins and Package Containing Pin Caps and Inspection Plugs
Verify that you have the correct number of concrete heads with the corresponding number of bearing pins (4 per pier), pin caps (4 per pier), and inspection plugs (4 per pier), and that the anchor nuts thread properly on the pier anchor bolts. Measure the pin diameter to be sure the proper pins have been supplied for your pier model. (The DP-50 model has a 1" nominal pin with a 1.315" actual outside diameter [OD]; DP-75 has a 1-1/4" nominal pin with a 1.67" actual OD.) If the pins do not fit, contact your supplier. The inspection plugs are inserted in the bottom of each bearing pin prior to installation to keep soil from moving up inside the pins as they are driven into the ground. This allows inspectors to slide a tape measure down a pin from above as a method to verify its length.
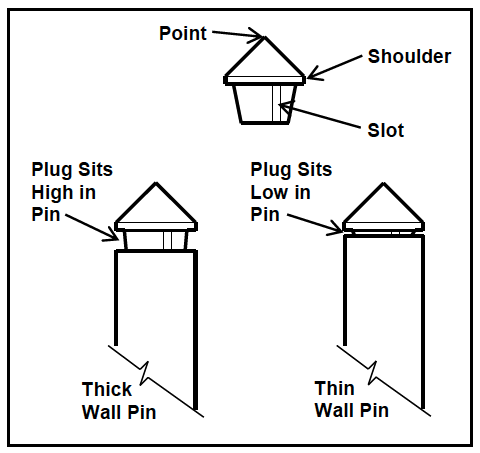
6. Install Inspection Plugs in Pins
Remove any dirt and debris from the pins and check that they will fit easily into the driving holes in the concrete heads. (If a cut or burr is restricting the fit, try the other end of the pin.)
Install the inspection plugs in the ends of the pins that will go into the concrete head first. Align the slot in the plug with the interior weld bead and insert (see Figure 4). The allowable tolerance in pin wall thickness means that some plugs will fit high in the end of the pin, and some will fit down almost to the plug shoulder. In either case, tap the point of the plug with a hammer to seat it firmly enough in the end of the pin so that it will not drop out as you slide it through the driving holes in the pier. Don’t worry that tapping the end of the plug with the hammer will blunt the point; it is not intended as a piercing or cutting tip, and this will happen anyway as the plug is driven into the soil. (See “Encountering Obstructions,” page 13, for plug use where buried obstructions may be encountered.)
Jump to Installation Manual Section:
Must Be Installed in Pins